Are you looking for that fun and creative project that can give you some instant gratification? Our latest course will have you working with your hands, learning some easy clay shaping skills, and painting whimsical faces. If this sounds like your cup of tea, this is the course for you!
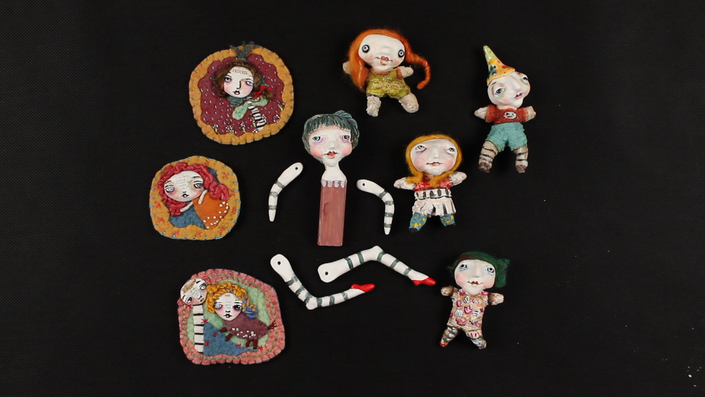
Sunny Carvalho has brought her “Creating in Dollandia” online course to Create Arts Online, and we could not be happier. This course will guide you through the creation of three different versions of small dolls that can be transformed into any workable size for you and your creative spirit.
Sunny starts with Polymer clay, and gives step-by-step direction for the process of how to shape the head and all the facial qualities of the “Wooden Body Doll.” She then demonstrates how to give them personality and expression with little touches and nuances. Once the face is shaped, she shares how to create the wooden body and gives a second option if you want to use a material other than wood. Once that is done, she explains how to create the arms and legs. Next, she will demonstrate how to create one of her “Mini Kids.” These are so great and take just a few materials to create. Once you build the parts of the head and bodies, you can add any other touches, and pop them into the Polymer clay oven for baking. After the proper baking time they will be ready to be painted.
Sunny teaches her signature painting techniques, but it is up to you to put your own unique spin and artistic voice into each of your dolls. Watching Sunny work and paint each brush stroke from an “over-hands perspective” provides a unique view and a special opportunity. Only on this platform will you watch and learn as Sunny creates from beginning to end. You can observe her make specific choices, and you will be able to refer back to each section of the course as often as you like.
Lastly, Sunny teaches how she creates her “Mini-Faces.” These are great to incorporate into a variety of different projects. She uses air-dry clay to create these faces so that you can create as many as you like. The best part of using both the Polymer clay, and the air-dry clay is that you never have to worry about working with a kiln or special glazes.
This course comes with a PDF for download with all the tools, materials, and resources to get started.

Tammy T.
Your Instructor

Sunny Carvalho is a mixed media artist living in Pinson, Alabama amid the chaos of too many art supplies. Focusing on functional yet whimsical ceramic ware, hand-sculpted ceramic pendants, freehand stitched characters and mixed media paintings, her quirky characters have found their way into many of the mixed media magazines and books. With an emphasis on the joy of everyday living, her work reflects the humor and oddity of the unique characters residing in her head as they deal with pets, situations, and each other. She began her mixed media career as an instructor with Artfest (a groundbreaking retreat near Seattle that launched the careers of many internationally known artists and had it's final retreat in 2012). Sunny continues to teach live but is thrilled to partner with Create Arts Online and bring her signature works to an online platform.
Course Curriculum
-
StartIntro and Personal Interview with Tami and Sunny (5:05)
-
StartPDF for Download with Tools, Materials, and Resources.
-
StartIntroduction to the Dolls. (0:18)
-
StartVisual of Tools and Materials. (4:27)
-
StartKits Available for Doll Parts. (0:14)
-
StartCondition the Polymer Clay and Create the Eyes and Nose. (8:01)
-
StartCreating the Cheeks. (4:39)
-
StartCreating the Lips. (5:45)
-
StartCreating the Chin and Hair. (6:41)
-
StartCreating a Cat Hat. (6:46)
-
StartDrill Holes for Wooden Body. (2:11)
-
StartAttach Head to Wooden Body. (4:18)
-
StartCreating the Arms and Legs. (5:11)
-
StartHow to Start the Mini Kids. (7:30)
-
StartCreating Cheeks and Chins on a Mini Kid. (7:51)
-
StartCreating the Hole for the Body to Attach. (0:58)
-
StartIntroduction of the Polymer Clay Oven. (1:20)
-
StartRepairing a Crack. (1:49)
-
StartStarting to Create the Body of a Mini Kid. (6:38)
-
StartAdding More Armature to the Body. (4:07)
-
StartCover Armature with Plaster. (5:43)
-
StartHow to Paint Wood Body Doll. (9:02)
-
StartHow to Paint Wood Body Doll Part 2. (6:27)
-
StartAdding Mix Media to the Body and other Details. (6:36)
-
StartPainting the Arms and Legs. (4:18)
-
StartPainting on the Shoes and more Details. (3:32)
-
StartAdding the Skirt. (5:01)
-
StartAttaching the Arms and Legs. (2:56)
-
StartStart to Paint the Mini Kids. (8:38)
-
StartAttaching the Body and More Painting Details. (8:19)
-
StartAntique Painting Effect on the Body. (1:32)
-
StartFixing Mistakes and Finishing Up the Painting. (4:04)
-
StartAdding Hair to the Mini Kid. (2:49)
-
StartAir Dry Clay Faces. (0:18)
-
StartCreating Tiny Faces with Wire Hangers. (2:51)
-
StartDrawing Tiny Faces. (2:27)
-
StartPainting Tiny Faces. (4:02)
-
StartWrap Up and Thank You! (0:07)